Optimize Video Control in Mangold INTERACT
Discover how to set the video controls to perfectly match your preferred level of video control.
As video content becomes more prevalent in our daily lives, having efficient ways to control video playback is becoming increasingly important. Whether you are a micro-analyst, who needs to examine every frame or someone who needs to quickly navigate through long recordings, having the right tools at your fingertips can save you time and frustration. This post will explore how you can optimize your video handling with Mangold INTERACT's Time Control Settings.
Long-time INTERACT users might remember the printout that came with every package that could be put on top of the keyboard to easily identify the default shortcuts to control the video.
Those default video control shortcuts have been assigned to these function keys for more than 20 years now. Over the years, the printout was replaced with a PDF, so users could reprint the template whenever needed, but the shortcut keys stayed the same.

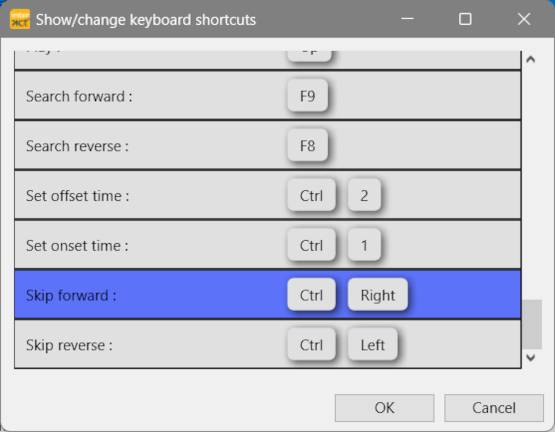
However, with the recent changes in hardware and the release of a native macOS version of INTERACT, many users may no longer have access to those function keys. That's why INTERACT 20 allows you to reassign shortcut keys to any of the video controls. This means you can customize your video controls to fit your specific needs.
For example, if you find it more convenient to use arrow keys for PLAY, PAUSE, FRAME FORWARD, and FRAME REVERSE, you can easily assign those shortcuts to those keys. But, if you use arrow keys to scroll up and down your document, you may need to find an alternative option. Smaller keyboards may also present a challenge because these often do not offer separate arrow keys, but with the ability to reassign shortcuts, you can find a solution that works for you.
The ability to move through your video frame-by-frame is perfect for all our micro-analysts, but what about the users watching 24/7 recordings?
Those users are probably more interested in speeding things up, so they would want to change the shortcuts for the quick search commands 'Search Forward' and 'Search Reverse' to make them more accessible.
But what if you want to skip through your video at a different pace?
Mangold INTERACT's Time Control Settings offer a solution for those needs. By defining a custom step width, you can jump or step through your video at any given pace. This means you can navigate through your video second by second, minute by minute, or maybe 10 or 15 frames per step.
To define your preferred step width, simply access the Time Control Settings through the gear icon on the Video Controls toolbar.

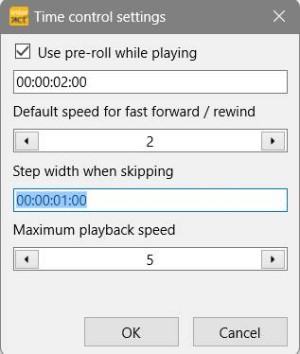
Once you enter your preferred time into the "Step width when skipping through the video" field, you can use the Skip forward and Skip reverse commands to navigate through your video quickly and accurately.
In earlier versions, this step width could be used by clicking on the left or right of the slider in the time progression bar. Since INTERACT 20, this no longer works because instead of the unspecific time progression bar there is now a timeline that allows you to position your video directly by clicking on a specific point in time.
Note: Zooming in on the timeline with the mouse wheel can also be useful for long recordings. This allows you to position the video more precisely when using the timeline.
In conclusion, optimizing your video handling with Mangold INTERACT's Time Control Settings can save you time and make your video playback experience more efficient. By customizing your shortcuts and defining your preferred step width, you can find the perfect fit for your specific needs.
So why not give it a try and see how much easier video playback can be?